Content Writing
꧁ Digital Diary ༒Largest Writing Community༒꧂
꧁ Digital Diary ༒Largest Writing Community༒꧂

Modern UI Components:
Cards for section separation
Better form controls (custom file inputs, select2 dropdowns)
Improved button styling
Enhanced UX:
Real-time character counters for SEO fields
Image upload preview functionality
Conditional display of price section
Better error/success message display
Organization:
Grouped related fields together
Properly labeled sections
Clear visual hierarchy
Responsive Design:
Works well on mobile devices
Adjusted layouts for smaller screens
Interactive Elements:
Tooltips and help links
Confirmation for delete actions
Visual feedback for form interactions
Code Structure:
Better organized template
External CSS/JS separated
Comments for important sections
This implementation maintains all your original functionality while significantly improving the user experience and visual design. The form is now more intuitive and professional-looking.
Would you like me to explain any specific part in more detail or make additional adjustments?
Imagine you're working with a really long document in Microsoft Word, like an academic paper or a big report. Depending on the project, it might be dozens or even hundreds of pages long! When a document is this large, it can be difficult to remember which page has what information. Fortunately, Word allows you to insert a table of contents, making it easy to organize and navigate your document.
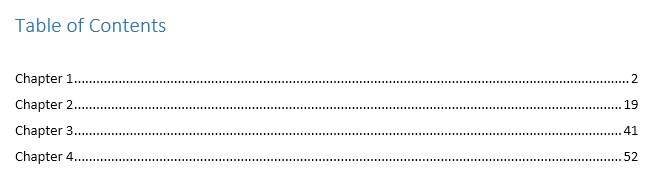
A table of contents is just like the list of chapters at the beginning of a book. It lists each section in the document and the page number where that section begins. A really basic table of contents might look like this:
You could create a table of contents manually-typing the section names and page numbers-but it would take a lot of work. And if you ever decide to rearrange your sections or add more information, you'll have to update everything all over again. However, with the right formatting, Word can create and update a table of contents automatically.
If you've already read our Applying and Modifying Styles lesson, you know they're an easy way to add professional text formatting to different parts of your document. Styles also serve another important purpose: adding a hidden layer of organization and structure to your document.
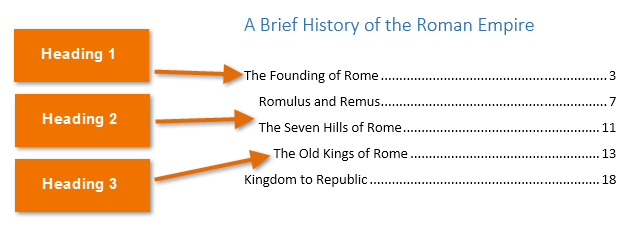
If you apply a heading style, you're telling Word that you've started a new part of your document. When you insert the table of contents, it will create a section for each heading. In the table of contents above, each chapter uses a heading style, so there are four sections.
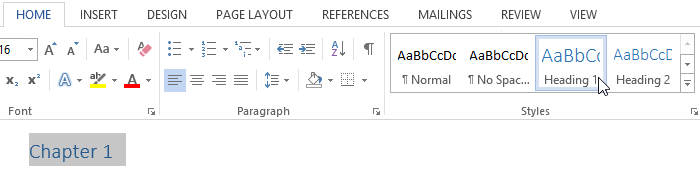
To apply a heading style, select the text you want to format, then choose the desired heading in the Styles group on the Home tab.
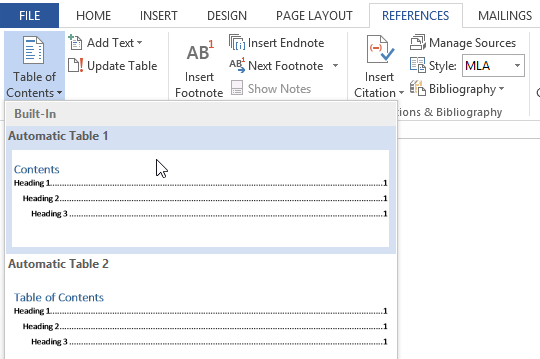
Now for the easy part! Once you've applied heading styles, you can insert your table of contents in just a few clicks. Navigate to the References tab on the Ribbon, then click the Table of Contents command. Select a built-in table from the menu that appears, and the table of contents will appear in your document.
As you can see in the image below, the table of contents uses the heading styles in your document to determine where each section begins. Sections that begin with a Heading 2 or Heading 3 style will be nested within a Heading 1 style, much like a multilevel list.
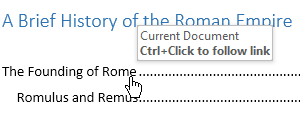
A table of contents also creates links for each section, allowing you to navigate to different parts of your document. Just hold the Ctrl key on your keyboard and click to go to any section.
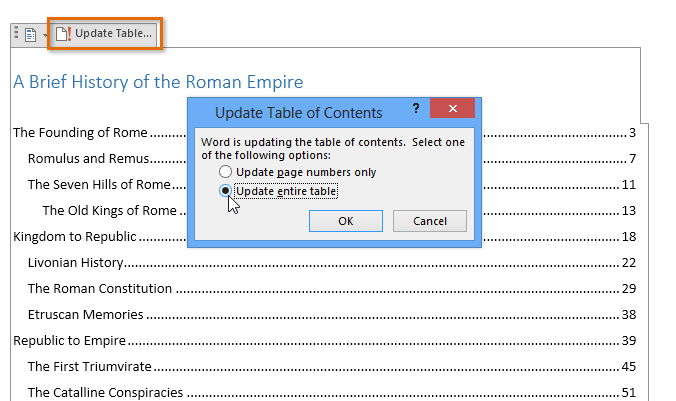
If you edit or add to your document, it's easy to update the table of contents. Just select the table of contents, click Update Table, and choose Update Entire Table in the dialog box that appears. The table of contents will then update to reflect any changes.
No matter how large your document may be, you can see there's nothing complicated about creating a table of contents. If you want even more control over how your table of contents appears, check out this tutorial from Microsoft on Taking a Table of Contents to the Next Level.
If you need to write a research paper, chances are you'll also be required to include a bibliography. Or you might be asked to include a works cited page or a list of references. These are all just different names for the same thing: a list of sources-such as books, articles, or even websites-that you used to research and write your paper. A bibliography makes it easy for someone else to see where you found your information. A short bibliography might look something like this:

You could create a bibliography manually, but it would take a lot of work. And if you ever decide to add more sources or use a different reference style, you'll have to update everything all over again. But if you take the time to input your sources into Word, it can create and update a bibliography automatically. This can save you a lot of time and help ensure your references are accurate and correct.
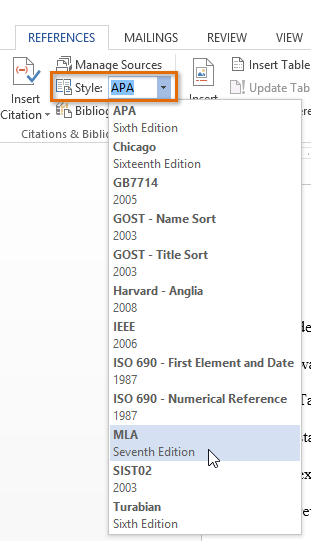
When you're creating a bibliography, you'll need to follow the guidelines of the required style guide. Different academic disciplines use their own styles guides, such as MLA, APA, and Chicago. Fortunately, Word comes with several built-in style guides; all you need to do is select the one you want to use, and Word will help you format your bibliography correctly.
To do this, click the References tab, then select the desired style in the Citations & Bibliography group.
You can use this same method to change the reference style at any time.
Whenever you use information from one of your sources, you'll need to give credit-or cite them. This is known as making a citation. You'll include citations whenever you use information from a source or when you quote a source directly.
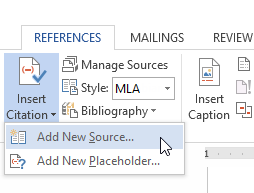
To add a citation, select the desired location for the citation in your document, click the Insert Citation command on the References tab, and select Add New Source.
A dialog box will appear. Enter the requested information for the source-like the author name, title, and publication details-then click OK.
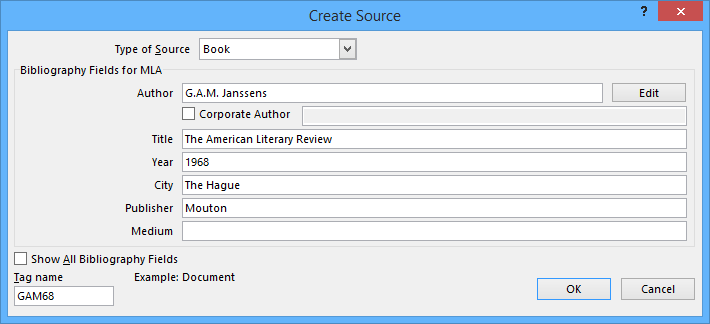
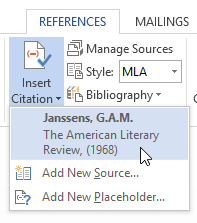
The citation will appear in the document, and the source will be saved. You can quickly add another citation for the source by clicking Insert Citation and selecting the source from the drop-down menu.
Time for the easy part! Once you've added all of your sources, you can create your bibliography in just a few clicks! Just select the Bibliography command, then choose the desired style.
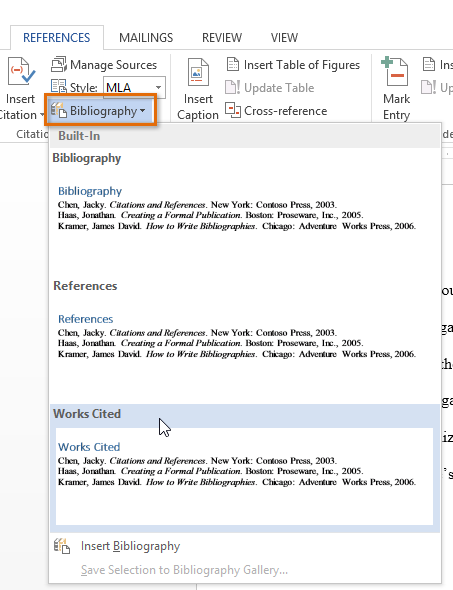
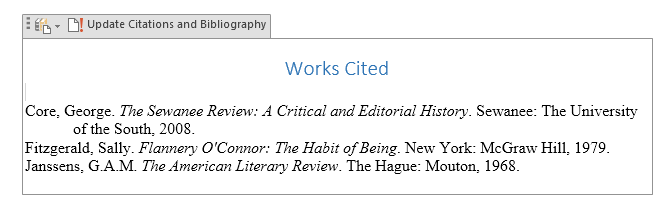
The bibliography will appear at the end of your document. Your sources will already be formatted to match the selected style guide. You should still double-check each of your sources against your style guide to make sure they're correct. If you need a quick reference for MLA, APA, or Chicago formatting, we recommend the Purdue Online Writing Lab.
If you add more sources to your document, you can easily update your bibliography-just click it and select Update Citations and Bibliography.
No matter how many sources you include in your document, Word's built-in tools make it easy to create and organize a bibliography. If you want further guidance with the process, check out this tutorial from Microsoft on how to Create a Bibliography
zxvxjhvj xvd lkhkjh
stall No 53 6 DDA market
Block 6 Dakshin Puri Extension Dakshinpuri
Dakshinpuri
New Delhi
110062
No FAQ Available.