Responsive या Fluid या Liquid Website Layout Design कैसे बनाएं
꧁ Digital Diary ༒Largest Writing Community༒꧂
꧁ Digital Diary ༒Largest Writing Community༒꧂
आजकल हर कोई चाहता है की उसकी website की design ऐसी हो की वह किसी भी device चाहे वह large screen वाली desktop हो या छोटी screen वाली mobile, सभी में लगभग एक समान दिखाई दे ऐसा इसलिए क्योंकि आजकल smartphone users की संख्या लगातार बढ़ रही है और अगर हम चाहते हैंकी ये users हमारी site पर visit करें तो हमें अपनी website mobile friendly बनानी पड़ेगी|
आज हम इस article में और CSS के द्वारा steb-by-step तरीके से liquid या fluid website layout design करना सीखेंगे जिससे हमारी वेबसाइट डिजाईन लगभग सभी screen sizes पर अच्छे से display हो सके|
आगे बढ़ने से पहले हम ये जानते हैं की आखिर fluid या liquid design होता क्या है| इससे पहले हमने fixed layout design करना सीखा था जिसमे हम जो design बनाते हैं उसकी size fixed होती है और वह large screen पर अच्छे से दिखाई देती है लेकिन छोटे आकार के devices के लिए उपयुक्त नही है, लेकिन fluid layout एक ऐसी design होती है जो की screen width के अनुसार अपने आप को adjust कर लेती है|
Fixed width layout में dimensions pixel में set किया जाता है जब की fluid design में layout की size को percentage में define किया जाता है जिससे वह किसी भी screen resolution और browser window के size के अनुसार उपलब्ध space में अपने आप को ढाल लेती है यहाँ तक की अगर user browser window की size को change करता है तो भी website के important parts बिना किसी restriction के दिखाई देने लगते हैं|
अब हम आसान तरीके से एक fluid layout बनाना सीखेंगे इसके लिए आप नीचे दिए गए steps को follow करते जाएँ, इससे पहले हम ये जानते हैं की इस डिजाईन को बनाने में आपको किन-किन चीजों की जरूरत पड़ेगी :
पढ़ें : CSS Media Queries - Inroduction in Hindi
सबसे पहले यह तय करें की layout का structure कैसा होगा उसके कितने parts होंगे हो website में कितने columns होंगे, आप चाहें तो किसी paper पर इसका एक rough sketch बना सकते हैं या कोई online tool का उपयोग कर सकते हैं, मैंने नीचे दिए गये sketch को gridpapr.com से बनाया है जो की बहुत आसान है आप चाहें तो इसका use कर सकते हैं|
हम इस tutorial में example के लिए three-column layout बनायेंगे जिसमे header, navigation, content, 2 sidebar और footer होंगे|
अब हम सभी sections header, menu, sidebar, contents और footer के लिए अलग-अलग div बनायेंगे और सभी के लिए CSS id या class use करेंगे| layout का html structure कुछ इस प्रकार होगा:
<div class="header"></div> <div class="nav"></div> <div class="left"></div> <div class="content"></div> <div class="right"></div> <div class="footer"></div>अब सभी classes को define करेंगे, यहाँ पर हम सभी sections की size को percentage में define करेंगे, left और right sidebar की width 20%, content की width 50% set करेंगे| header, navigation और footer के लिए कोई भी width define नही करेंगे क्योंकि इनकी width 100% होगी|
.header { background: #ccc; padding: 2em 2em; } .nav { background: #777; padding: 1em 2em; margin-bottom: 1em; } .left, .content, .right { float: left; background-color: #fff; margin-bottom: 1em; margin-left: 2%; } .left { width: 20% } .content { width: 50% } .right { width: 20% } .footer { background: #777; padding: 1em; clear: both; }हमने layout की design कर ली है अब इसमें कुछ contents insert करेंगे और इसका output देखेंगे| इसका complete HTML और CSS code नीचे दिया गया है :
HTML Code
<div class="header"></div> <div class="nav"></div> <div class="left"> <h2>About</h2> Vestibulum ante ipsum primis in faucibus orci luctus et ultrices posuere cubilia Curae; Proin nunc arcu, posuere et auctor eget, ultrices vitae massa. Donec at pharetra purus, eget malesuada velit. Nunc dictum fermentum ligula id viverra. Pellentesque at mi porttitor, eleifend odio ut, aliquam mauris.</div> <div class="content"> <h2>Heading</h2> <p>Lorem ipsum dolor sit amet, consectetur adipiscing elit. Vestibulum rhoncus velit diam, at semper velit ornare ac. Cras mollis faucibus dui, at sollicitudin augue gravida ut.</p> <p>Ut imperdiet massa sem, non cursus odio euismod vel. Sed consequat, massa vitae dignissim tincidunt, turpis ante mattis libero, vulputate cursus ante nibh sollicitudin ipsum. Praesent ac risus vel nunc egestas molestie. Phasellus elementum, ipsum eu varius maximus, lectus purus blandit augue, ut finibus sem eros vel arcu. Nam sagittis augue in ex pretium, et auctor justo efficitur.</p> </div> <div class="right"> <h2>Links</h2> <ul> <li><a href="#a">Home</a></li> <li><a href="#a">Articles</a></li> <li><a href="about.html">About</a></li> <li><a href="contact.html">Contact</a></li> </ul> </div> <div class="footer"></div>CSS Code
.header { background: #ccc; padding: 2em 2em; } .nav { background: #777; padding: 1em 2em; margin-bottom: 1em; } .left, .content, .right { float: left; background-color: #fff; margin-bottom: 1em; margin-left: 2%; } .left { width: 20% } .content { width: 50%; } .right { width: 20% } .footer { background: #777; padding: 1em; clear: both; }Final Output
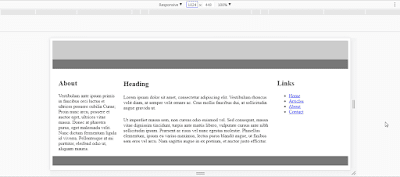
 |
| Screen Size: 1024x448px |
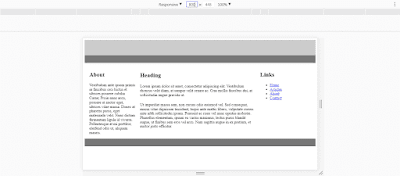
 |
| Screen Size:800x448px |
अगर आप ऊपर दिए steps को follow करते हैं तो आप आसानी से एक simple fluid या liquid layout design बना सकते हैं| अगर आपको इस article से जुड़े कुछ सवाल पूछने हैं या कुछ कहना चाहते हैं तो आप नीचे comment box का उपयोग कर सकते हैं|
We are accepting Guest Posting on our website for all categories.
I want to Hire a Professional..
Sanjeev panday
@DigitalDiaryWefru